SSH
Sonic allows you to ssh into an instance quickly.
Often when working with AWS EC2 it is helpful to ssh into an instance to debug. To ssh into an instance, the first thing you do is go to the EC2 Console and grab the public IP address.
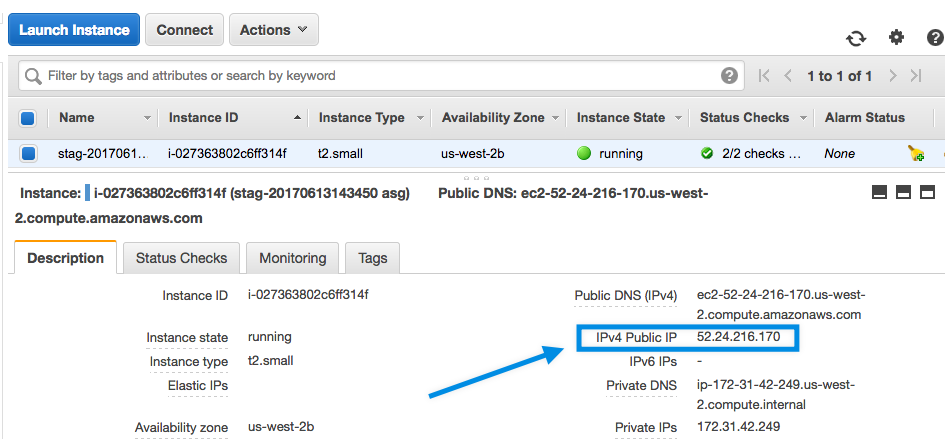
You use that IP address to build up an ssh command for accessing the instance. Here’s an example of the built-up ssh command.
ssh ec2-user@52.24.216.170
You often have to go through this manual process of identifying the public IP address and building up the ssh command repeatedly.
Usage
Sonic automatically builds up the ssh command for you. Here’s an example of the sonic ssh command.
sonic ssh i-027363802c6ff314f
The above command effectively translates to:
ssh ec2-user@52.24.216.170
By default the user that sonic uses to log in to the server is ec2-user. You can override the user as part of the sonic command like so:
sonic ssh ubuntu@i-0f7f833131a51ce35
The default user can also be configured with a ~/.sonic/settings.yml or the project’s .sonic/settings.yml file like so:
ssh:
  user: ec2-user
More information about sonic settings in available in the docs: Settings.
Polymorphic Identifiers
The sonic ssh command can auto-detect the proper IP address with a variety of different identifiers. The identifier is not limited to the instance id. The identifier can be an EC2 tag-value filter, ECS service name, ECS container id or ECS task id.
Polymorphic identifiers are convenient in case you happen to be on a dashboard with another identifier close by and handy. Here are examples of identifiers that sonic ssh understands.
sonic ssh EC2_TAG_FILTER
sonic ssh ECS_SERVICE --cluster staging
sonic ssh ECS_CONTAINER_ID --cluster staging
sonic ssh ECS_TASK_ID --cluster staging
The EC2 tag filter uses the ‘tag-value’ filter as described in the AWS describe-instances filter docs. This filter is independent of the tag-key filter, which means any EC2 tag value will match, regardless of the tag key name. Sonic does not support spaces in the EC2 tag filter.
Notice, that when the sonic ssh is passed an ECS identifier then it also requires the ECS cluster name. The commands above with the ECS identifier are normally shorten further by configuring the a settings file. Here’s an example:
ecs_service_cluster_map:
  default: my-default-cluster
  hi-web: production
  hi-clock: production
  hi-worker: production
With these settings in place, the ECS identifier commands get shortened to become:
sonic ssh ECS_CONTAINER_ID
sonic ssh ECS_SERVICE
sonic ssh ECS_TASK_ID
It then becomes effortless to ssh into an EC2 Container Instance with the ECS service name. For example, if the ECS service name is hi-web then the command becomes.
$ sonic ssh hi-web
# now you are on the container instance
$ docker ps
$ curl -s http://localhost:51678/v1/meta | jq .
The hi-web can be running on multiple container instances. The sonic ssh command chooses the first container instance that it finds. If you need to ssh into a specific container instance, then use the sonic ssh command with an instance id instead.
You can also use the ECS container instance arn or task id to ssh into the machine. Examples:
$ sonic ssh 7fbc8c75-4675-4d39-a5a4-0395ff8cd474 # ECS container id
$ sonic ssh 1ed12abd-645c-4a05-9acf-739b9d790170 # ECS task id
Bastion Host
Thus far we have assumed that the instances we are hopping into are publicly available on a public subnet and have a public IP address associated with it. A typical AWS setup is to have your servers on internal subnets without public addresses. In this case, we must first ssh into the bastion host, and from there we can “jump” into the actual server. This why the bastion host is also called a jump host.
If you have a bastion host server which provides access to your internal servers, then it is, even more, work to build up the ssh command. The good news is that the sonic ssh command supports bastion hosts and automates this process! The Bastion Setup doc covers how to set this up.
Automatic Retry
On a freshly launched EC2 instance, the instance and ssh daemon take a little time before it’s ready. Typically, you repeatedly press up and enter until you can access the server. Sonic ssh has a -r option which automates this process. Example:
$ sonic ssh -r i-0b21da68fff89937b
Can't ssh into the server yet.  Retrying until success.
....
=> ssh -o StrictHostKeyChecking=no -o UserKnownHostsFile=/dev/null -At ec2-user@34.214.143.125
[ec2-user@ip-10-11-35-76 ~]$
Specifying Custom Pem or Private Keys
It is recommended that you use ssh-agent to specify a custom private key, covered here 3 SSH tips: Ssh-agent, Tunnel, and Escaping from the Dead. But you can specify the private key if you prefer with the -i option though. Example:
$ sonic ssh -i ~/.ssh/id_rsa-custom i-0b21da68fff89937b
[ec2-user@ip-10-11-35-76 ~]$
Pro tip: Use the <- and -> arrow keys to move back and forward.
Edit this page
See a typo or an error? You can improve this page. This website is available on GitHub and contributions are encouraged and welcomed. We love pull requests from you!
- Suggest an edit to this page (here's the contributing guide).
- Open an issue about this page to report a problem.